The most common reason people don’t automate their workflows is the assumption that it requires coding. It doesn’t. The no-code tool ecosystem has matured to the point where you can build genuinely useful AI-powered automations in an afternoon, using a visual drag-and-drop interface and no programming knowledge whatsoever.
I’ve built automations for my own work and helped people with varying technical backgrounds do the same. The ceiling on what’s possible without code is higher than most people realize, and the learning curve for the first automation is much shorter than the first time you try it feels like it should be.
This guide walks through the tools, the mindset, and the practical process for building your first no-code AI automation.
What No-Code Automation Actually Means
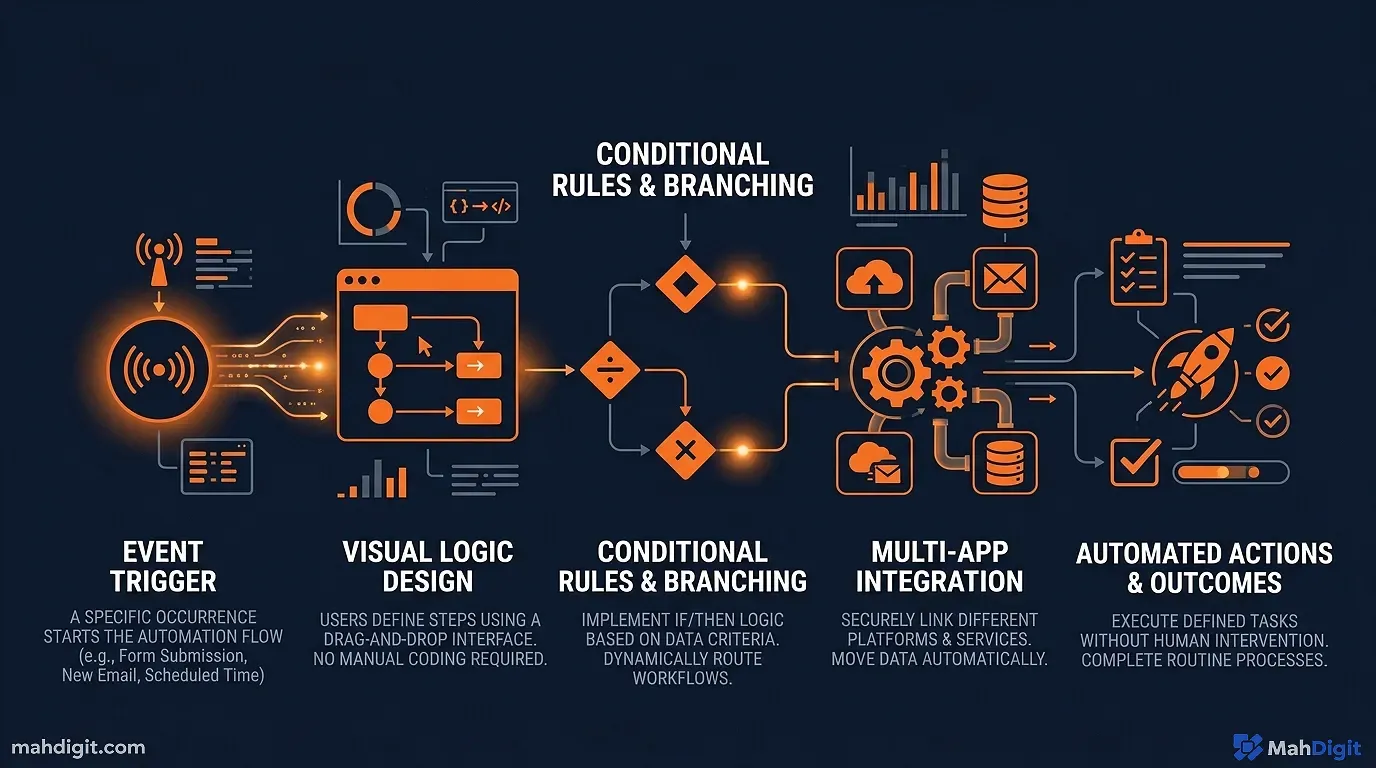
No-code automation tools let you connect software applications and define rules for how they interact without writing code. The logic looks like this:
When [something happens in App A] Do [something in App B]
Add AI to that pattern and you get:
When [something happens in App A] Process with AI (summarize, classify, generate) Do [something in App B]
Examples of what this enables:
- New email tagged “urgent” ChatGPT writes a draft reply saves to your drafts folder
- New row added to Airtable AI generates a personalized message sends via Gmail
- Meeting ends (Otter.ai transcription complete) AI extracts action items creates tasks in Asana
- Form submitted AI scores and qualifies the lead sends Slack notification to sales
These run automatically, in the background, every time the trigger fires. No manual steps. No touching the automation once it’s built.
The No-Code Tool Landscape
Three tools dominate the no-code automation space for AI workflow integration:
Zapier
Best for: Beginners and anyone who values ease of use over cost.
Zapier has the largest library of app integrations (7,000+ apps), the most intuitive interface, and native ChatGPT integration that makes building AI-powered steps genuinely accessible. The drag-and-drop workflow builder is well-documented.
Pricing: Free (limited Zaps, no AI steps) / Starter $19.99/mo / Professional $49/mo
The free plan is too limited for AI workflows you’ll need Starter or above for access to the ChatGPT action and multi-step Zaps.
Make.com (formerly Integromat)
Best for: More complex workflows, lower cost at volume, visual thinkers who like seeing the full flow.
Make’s visual interface shows your entire automation as a connected diagram you can see every step and how data flows between them. It’s more powerful than Zapier at the same price point, and significantly cheaper at volume.
Pricing: Free (1,000 operations/month) / Core $9/mo / Pro $16/mo
Caveat: The learning curve is steeper than Zapier. Plan for 2-3 hours of orientation before building your first automation if you’re new to no-code tools.
n8n (For the Technically Comfortable)
Best for: People comfortable with a bit of configuration who want control and lower cost.
n8n is open-source and can be self-hosted (free) or used as a cloud service ($20/mo). It’s more flexible than either Zapier or Make, but requires more setup and troubleshooting tolerance. If you’re comfortable with technical tools but not with writing code, n8n is worth evaluating.
Building Your First Automation: Step by Step
Let’s build a real automation from scratch. I’ll use Zapier + ChatGPT for this example since it’s the most accessible combination for most people.
Automation goal: When a contact submits your website contact form AI generates a personalized response draft saves it as a Gmail draft for you to review and send.
What you need: A Zapier account ($19.99/mo Starter), a website form (Typeform, Jotform, Google Forms all integrate), a Gmail account, and a ChatGPT/OpenAI account with API access.
Step 1: Set Up Your Trigger
In Zapier, click “Create Zap.” Select your form tool (e.g., Typeform) as the trigger app. Choose the trigger event: “New Entry.”
Connect your Typeform account and select the specific form you want to trigger on. Test the trigger by submitting your form Zapier will detect the submission and show you what data it received (name, email, message, etc.).
Step 2: Add the AI Step
Click the ”+” button to add an action. Search for “ChatGPT” and select the “Send Message” action.
Connect your OpenAI account (you’ll need an API key from platform.openai.com free to get, pay-per-use pricing).
In the Message field, use Zapier’s data mapping to build your prompt dynamically:
You are a friendly, professional assistant responding to a website inquiry.

The person's name is: {{Name from form}}
Their email: {{Email from form}}
Their message: {{Message from form}}

Write a personalized, helpful response email:
- Acknowledge their specific question or request
- Provide a direct, useful answer or next step
- Keep it under 150 words
- Warm but professional tone
- Do not use filler phrases like "thank you for reaching out"

Return only the email body, no subject line.
The {{brackets}} pull in data from the form submission automatically. Every time a new form is submitted, the prompt is filled with that person’s actual information.
Step 3: Save as Gmail Draft
Add another action step. Select Gmail, action event: “Create Draft.”
Map the fields:
- To: the submitter’s email from the form
- Subject: type a static subject like “Re: Your Website Inquiry” or make it dynamic
- Body: the ChatGPT output from Step 2
Step 4: Test and Turn On
Zapier has a test mode that runs a real test using the sample data from when you set up the trigger. Run it, check Gmail to see if the draft appeared, read the draft to confirm the AI response is reasonable, and then turn the Zap on.
Now every form submission automatically generates a personalized draft in your Gmail you review, adjust if needed, and send. Manual writing time: near zero.
AI Steps That Work Best in No-Code Automations
Not every AI task is well-suited to a background automation. These consistently produce reliable results in no-code workflows:
| Task | What it Does | Reliability |
|---|---|---|
| Summarization | Condense long input to key points | High |
| Classification | Tag or categorize content (support ticket type, lead quality, topic) | High |
| Formatting | Convert unstructured input to structured output | High |
| First-draft generation from template | Generate text from structured inputs (like form data) | High |
| Open-ended creative | Write content without clear structure or constraints | Medium |
| Research or fact lookup | Get current factual information | Low (use Perplexity via API instead) |
For the tasks marked High, automation works reliably. For Medium and Low, you’ll want human review in the loop before the output goes anywhere important.
5 No-Code Automation Ideas to Try
Pick one from this list to build as your first automation:
- Lead qualification: CRM new contact AI scores based on company size, role, and message tags in CRM as “Hot / Warm / Cold”
- Social media repurposing: New blog post published (RSS) AI generates 3 LinkedIn posts and a tweet saves as Google Doc drafts
- Support ticket routing: New Zendesk ticket AI categorizes by issue type and urgency assigns to correct agent queue
- Meeting follow-up: Otter.ai transcript completed AI extracts action items and summary creates tasks in Asana + sends email summary to attendees
- Content brief generation: New SEO keyword added to Airtable AI generates a 500-word content brief adds to your content planning database
Each of these can be built in Zapier in under 2 hours, once you’re familiar with the interface.
Common No-Code Automation Mistakes
Building too complex too fast. Your first automation should have 3-4 steps maximum. Complexity compounds: a 10-step automation with one error at step 6 fails silently and is hard to debug. Start simple.
Not testing before going live. Always test with real data before activating an automation that touches external systems (sending emails, creating tasks, posting content). The test mode in Zapier and Make is there for this reason.
No error alerting. Configure your automation tool to email you when a Zap fails. Most first-time automations have failure points you want to know immediately, not days later when you realize things haven’t been running.
Not reviewing AI output. AI makes mistakes. In a fully automatic pipeline where AI output goes directly to a customer or colleague, those mistakes are visible and public. For high-stakes outputs, add a “pause and review” step where the automation saves a draft and waits for your approval.
Key Takeaways
No-code automation with AI is genuinely within reach for anyone willing to spend a few hours learning the tools. The payoff is automations that run 24/7 without your involvement.
- Zapier is the easiest starting point; Make is better value for complex workflows
- Start with a simple 3-4 step automation before building anything complex
- High-reliability AI tasks (summarization, classification, formatting) work best
- Always test before activating and set up error alerts
- The goal is reducing your mechanical work, not eliminating your judgment
Related Articles
- ChatGPT vs Claude vs Gemini: Which AI Should You Use?
- Claude AI Review 2026: The Best AI for Writing?
- Getting Started with ChatGPT: A Practical First-Week Guide
- Grammarly AI Review 2026: Beyond Grammar Checking
What’s Next
- For a deeper walk-through of building AI workflows end to end, see How to Build an AI Workflow That Saves 10+ Hours a Week
- Our AI for Small Business guide covers no-code automation use cases specifically for small teams
- The full tool landscape (including Zapier AI pricing) is in 10 Best AI Tools for Productivity in 2026
External Resources
- Zapier’s Getting Started Guide official walkthrough for building your first Zap
